Oven-Baked Kansas City Burnt Ends: Tender & Delicious BBQ Bliss
Craving the best Oven Kansas City Burnt Ends Tender & Delicious? Discover my simple recipe for juicy, smoky burnt ends that are perfect for gatherings!

- Premium Core Components
- Signature Seasoning Blend
- Smart Substitutions
- Kitchen Equipment Essentials
- Getting Started with the Recipe
- Oven-Baked Kansas City Burnt Ends: Tender & Delicious BBQ Bliss
- Pro Tips & Secrets for Oven Kansas City Burnt Ends
- Perfect Presentation: Make ’Em Pretty!
- Storage & Make-Ahead: Keep It Fresh
- Creative Variations: Mix It Up
- Complete Nutrition Guide: Feel Good About Your Meal
- Frequently Asked Questions
- Recipe Card
You ever have one of those meals that just hits you right in the feels? for me, it was the time my dad fired up the smoker in our backyard for a saturday bbq.
The aroma of kansas city bbq wafting through the air instantly made me hungry. i remember him pulling those juicy burnt ends from the grill and being like, “oh my gosh, can we just live in this moment forever?” fast forward to today, i’m here to share my very own oven recipe for oven kansas city burnt ends: tender & delicious that’ll bring that same joy without needing a smoker.
Trust me; you’ll want this recipe in your cooking arsenal.
Recipe Overview
So, what is the deal with burnt ends anyway? they hail straight from the heart of kansas city bbq culture, where they’re usually made from the point of a brisket , giving them that killer flavor and tenderness.
Folks all over have embraced them because, let’s be honest, who doesn’t love a good bbq dish that melts in your mouth? more and more, burnt ends are showing up at barbecues and parties, not to mention they’ve become a go-to for comfort food lovers across the country.
Ready for some numbers? making these burnt ends will take you about 5 hours and 30 minutes from start to finish.
But don’t let that scare you! most of that time is just letting things do their thing in the oven.
They're listed as a medium difficulty level because it’s got a few steps—but hey, follow along, and you’ll get the hang of it.
Worried about cost? Here’s the kicker. With the right ingredients, you can whip up approximately 6 servings of melt-in-your-mouth burnt ends for around $20-$30 . Not too shabby for a crowd-pleaser, right?
Key Benefits
Now, let's chat about why you should make this dish. first off, these burnt ends aren’t just a party treat; they’re packed full of flavor and loaded with protein.
Seriously, we’re talking 30 grams of protein per serving! plus, the rich, smoky flavor from the homemade bbq sauce will have your taste buds dancing.
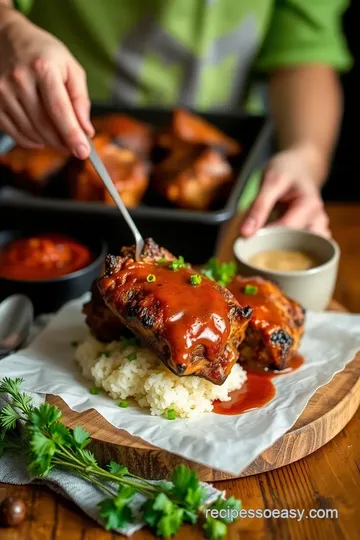
And you know what? They’re not just for dinner. These little bites are a hit at parties or tailgates! Serve them up as an appetizer or over a bed of rice for a comforting meal—we'll get to some great BBQ side dishes later on!
Plus, they take the classic bbq experience up a notch compared to some other recipes. you won’t find any boring, dry meat here! a well-cooked batch of these beef recipes oven will satisfy even the biggest bbq snobs.
So if you are looking for the perfect pulled pork alternative that everyone will adore, look no further. These Oven Kansas City Burnt Ends: Tender & Delicious are about to steal the spotlight at your next gathering!
Okay, enough chit-chat. Let’s dive into the ingredients you’ll need to make your BBQ dreams come true!
Oven-Baked Kansas City Burnt Ends: Tender & Delicious BBQ Bliss
Alright, friends! if you’re anything like me, you’ve probably daydreamed about the smoky goodness of kansas city bbq more times than you can count.
Those juicy, tender burnt ends are a barbecue lover’s dream! i'm here to break it down for you, and trust me, you won’t need a smoker to nail that tender, smokey goodness.
We’re talking about oven kansas city burnt ends tender & delicious right here!
Premium Core Components
Now, let's start with the essentials. when you're whipping up these savory barbecue sauce drenched bits of heaven, precise measurements matter—especially when you want your beef recipes oven perfection.
Grab yourself a nice 3 lbs (1.36 kg) beef brisket point , trimmed of any heavy fat to keep it light and crispy.
Here's a little pro tip: cooking brisket low and slow is key! you can expect to spend about 5 hours and 30 minutes on the whole process, but oh boy, is it worth it.
For best results, avoid the temptation to rush—your taste buds will thank you.
Signature Seasoning Blend
Alright, let’s spice things up! this is where the magic happens with an essential spice blend. mix 2 tablespoons of brown sugar with 1 tablespoon each of smoked paprika, kosher salt, black pepper, garlic powder , and a wee bit of cayenne if you’re feeling spicy.
You’re not just mixing sprinkles; you’re crafting a flavor-packed rub! once that brisket is seasoned up and marinated in this goodness, you’ll be in bbq bliss.
Those flavors bursting in your mouth? total game-changer!
Smart Substitutions
Worried about dietary needs? no problem! if you're looking for a pulled pork alternative , feel free to switch it up with pork belly, or even go vegetarian with some marinated jackfruit.
And if you’re short on time, grab a store-bought bbq sauce , but boost it up with extra spices for that homemade touch.
Let’s be real; we’ve all been there, scrambling to whip something together. So, whether you’re in a pinch or just feeling creative, knowing these common alternatives is super handy.
Kitchen Equipment Essentials
Let’s talk about the tools of the trade. you definitely don’t need a full chef’s kitchen for this—just a few must-have pieces.
A sharp knife and a solid cutting board will do wonders for prepping your brisket.
Don’t forget a meat thermometer ! critical temperature for tenderness is about 195° f ( 90° c) . and if you’re still scratching your head about the rest—you can whip up that killer bbq sauce in a saucepan without breaking a sweat.
Getting Started with the Recipe
So, what's the plan? start by prepping that brisket. cut it up into 1-inch cubes , toss it into your killer spice mix, and make sure it's all beautifully coated.
Marinate for at least 2 hours , but hey, overnight works wonders too!
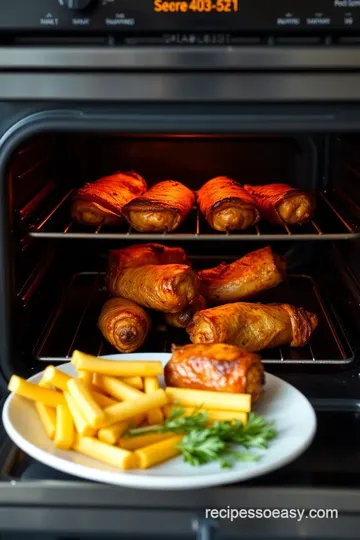
After some patient waiting (which can feel like forever), fire up your oven to 275° f ( 135° c) . that low heat is crucial for that smokey flavor without a smoker! cover those babies tightly with aluminum foil and let them bake for 2 hours .
Next, it’s time to unveil the succulent meat! pour on half of that fabulous bbq sauce, then boost the temp to 300° f ( 150° c) for another 30- 45 minutes until they get all caramelized and crispy.
When those bad boys are done, you won’t be able to resist grabbing a fork. Get ready to dish them out with some classic BBQ side dishes for a killer meal.
Now that we’ve covered the essentials, let’s dive into the step-by-step directions to make sure those juicy burnt ends come out perfect! You won't regret this—trust me!
Oven-Baked Kansas City Burnt Ends: Tender & Delicious BBQ Bliss
Oh my gosh, folks! if you've been dreaming of that melt-in-your-mouth, smoky flavor of kansas city bbq , you’ve gotta try these oven kansas city burnt ends .
Honestly, they are the epitome of bbq goodness! this classic dish—made from the brisket point—is all about balance. you get that rich, savory flavor kicking back with a bit of sweetness from a homemade bbq sauce that'll have your taste buds doing a little dance.
Essential Preparation Steps
Before diving into those tender chunks, let’s talk about getting everything prepped like a pro. first up, mise en place .
This fancy term just means having everything ready to roll. chop your beef brisket, mix your spices, and whip up that sauce ahead of time.
It'll make things so much smoother.
Next, time management is key here. for that rich flavor to come through, you’ll want to marinate those brisket chunks for at least 2 hours —but if you can swing an overnight soak? do it! your patience will pay off.
Organizing your kitchen is also a game-changer; a clean space means fewer distractions.
Oh, and while we’re at it, safety is no joke. be extra cautious when handling raw meat, and get a good meat thermometer if you don’t have one yet! you want to ensure that delicious bbq doesn’t turn into a food safety issue.
We want our food to be tender and delicious , not a health risk!
Step-by-Step Process
Alright, let’s break down the process step-by-step.
- Prep Your Brisket : Trim away any extra fat from 3 lbs of beef brisket point, and cut it into 1-inch cubes .
- Season It Up : In a bowl, mix 2 tablespoons of olive oil, 2 tablespoons brown sugar, and seasonings like smoked paprika, kosher salt, and everything else. Toss those brisket cubes in that mix until they’re well coated.
- Marinate : Pop that bowl in the fridge for at least 2 hours . Trust me, the flavor will be worth the wait!
- Bake : Preheat your oven to 275° F ( 135° C) . Lay those glorious cubes on a baking sheet, cover it with aluminum foil, and bake for 2 hours .
- Make the Sauce : In a saucepan, mix together your BBQ sauce ingredients , simmering them on low for 10 minutes . Just enough to let the flavors pop!
- Final Bake : After the 2 hours , remove the foil and crank the heat up to 300° F ( 150° C) . Pour half the sauce over the meat. Bake uncovered for an additional 30- 45 minutes . Look for that beautiful caramelization—it's the sign of deliciousness!
Expert Techniques
When it comes to nailing bbq, it helps to know a few expert tricks. always use a meat thermometer! you want to hit that 195° f ( 90° c) mark for maximum tenderness.
Another pro tip? let your burnt ends rest for about 10 minutes before diving in. this helps keep those juices intact.
If something goes awry, don’t sweat it. bbq can be finicky, but if it’s not turning out as planned, just add a little more bbq sauce during the last bake.
It helps hide a multitude of sins!
Success Strategies
Now, let’s chat about common mistakes to steer clear of. overcooking is the top contender! if it’s dry, it’s a bummer.
Use that meat thermometer; trust me, it'll save you from heartbreak. for quality assurance, always taste as you go—if something’s lacking, adjust on the fly!
Want to save time? Think ahead! You can marinate the night before or even make the BBQ sauce and fridge it. These little steps make those backyard barbecue ideas so much simpler.
So there you have it— Kansas City BBQ Burnt Ends you can whip up right in your oven!
As we gear up to dive into the perfect sides for your bbq feast, feel the excitement! trust me, the classic american bbq goodness of these burnt ends will be just the start of a flavor-packed barbecue.
Additional Information
If you’re looking for more ways to elevate your BBQ game, stick around for some killer side dish ideas and pro tips. Let's make cooking together an adventure!
Pro Tips & Secrets for Oven Kansas City Burnt Ends
Alright, let’s dive into the juicy world of oven kansas city burnt ends: tender & delicious bbq bliss ! i can't even tell you how many barbecues i've attended where friends raved about burnt ends.
The key to nailing this dish lies in a few pro tips that i've learned the hard way (and believe me, no one likes a dry brisket!).
First off, let’s talk about timing . marinating your brisket is so important. i usually recommend giving it at least 2 hours —though, if you can let it sit overnight, even better! it allows all those flavors to really sink in.
Flavor enhancement is another biggie. ever thought of tossing in a teaspoon of liquid smoke to your seasoning? total game-changer for that smoky flavor in bbq! also, don’t skimp on the brisket rub recipe .
A mixture of smoked paprika, garlic powder, and brown sugar will have your taste buds singing.
For quick cooking, save some effort by prepping your savory barbecue sauce while the meat is baking. this also gives a kick of flavor to the burnt ends when you toss them in the sauce before serving.
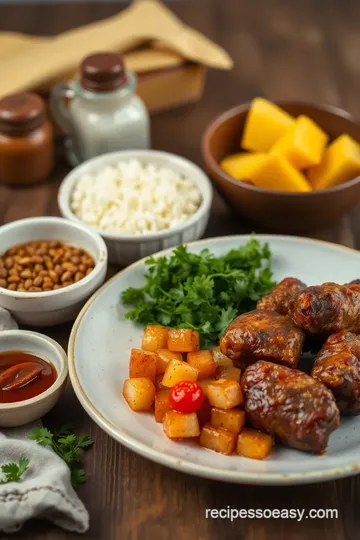
Perfect Presentation: Make ’Em Pretty!
So you’ve got your tender brisket cooking nice and slow, and now it’s time to plate. Presentation is everything, right? A nice, clean plate makes those juicy burnt ends pop!
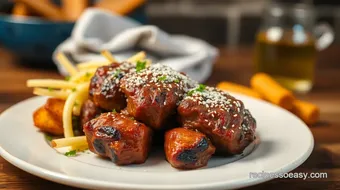
To plate like a pro , start with a nice scoop of coleslaw. then layer the burnt ends on top, drenching them in your homemade bbq sauce.
Oh, and don’t forget a sprinkle of chopped green onions or even some freshly chopped parsley for a pop of color.
It’s all about those color combinations . make your bbq dish visually appealing, and trust me, your friends will be snapping pics for insta!
Storage & Make-Ahead: Keep It Fresh
Now let’s get practical. maybe you did a huge cook and have leftovers — lucky you! storage guidelines ? make sure to let those burnt ends cool before you seal them in an airtight container.
They’ll last about 3-4 days in the fridge, but trust me, this tender meat preparation won’t last long!
If you're all about the meal prep, you can even make them and freeze them. just ensure you’re using freezer-safe containers.
Chop, store, and when you’re ready to enjoy, let them thaw before reheating in the oven at 250° f ( 120° c) for about 30 minutes—just long enough to warm them through.
Creative Variations: Mix It Up
Now, if you’re feeling adventurous, why not play around with some creative barbecue recipes ? you could try spicy chipotle burnt ends by adding chipotle powder.
Or, if you’re in the mood for sweetness, a drizzle of honey in the bbq sauce adds a lovely touch.
Don’t shy away from experimenting with meat, either! If brisket isn’t your jam, try using pork belly for a different but equally delicious experience. It’s all about those pulled pork alternatives !
Complete Nutrition Guide: Feel Good About Your Meal
Alright, let’s break down the numbers. everyone loves a good complete nutrition guide ! one serving ends up being around 400 calories , packing in around 30 grams of protein .
It’s comfort food goodness without the guilt. just remember, moderation is key!
If you’ve got dietary considerations, you can tone down the salt or switch to lower-carb sauce options. Everyone should be able to indulge in these flavor-packed meats !
So, what’s the takeaway here? cooking doesn’t have to be daunting. with the right cooking techniques for brisket and a little planning, you can impress friends and family with your homemade kansas city style barbecue right in your oven.
And hey, don’t forget to make those bbq side dishes your own—it’s all about flavor, after all!
In closing, if you’ve ever wondered if you could create that restaurant-quality experience at home, the answer is a resounding yes! look into into oven kansas city burnt ends: tender & delicious , and i promise it will become your new backyard barbecue staple.
Now, let’s get cooking!
Frequently Asked Questions
What are Kansas City Burnt Ends and how do they differ from regular BBQ brisket?
Kansas City Burnt Ends are the flavorful, crispy tips from the point cut of a brisket, traditionally smoked for a long time. In contrast, standard BBQ brisket is sliced thinly and served as is. Burnt ends are known for their rich, smoky flavor and caramelized exterior, making them a beloved BBQ treat.
How can I ensure my Oven Kansas City Burnt Ends are tender and delicious?
To achieve tender and delicious Oven Kansas City Burnt Ends, cook the brisket cubes slowly at a low temperature (275°F or 135°C) and ensure they reach an internal temperature of about 195°F (90°C). Letting the burnt ends rest for about 10 minutes after cooking also helps maintain their juice and tenderness.
Can I make Kansas City Burnt Ends in advance and how should I store them?
Yes, you can make Kansas City Burnt Ends in advance! After cooking, allow them to cool completely, then store them in an airtight container in the refrigerator for up to 3 days. For longer storage, you can freeze them for up to 3 months. When reheating, just ensure they’re warmed thoroughly and add a bit more BBQ sauce if needed to restore moisture.
What is the best way to serve Oven Kansas City Burnt Ends?
Oven Kansas City Burnt Ends can be served as a hearty main dish or a fun appetizer. Pair them with classic sides like coleslaw, cornbread, or baked beans. For a complete BBQ experience, enjoy them with refreshing iced tea or a cold craft beer!
Are there any healthy variations I can try for Oven Kansas City Burnt Ends?
If you're looking for healthier variations, you can use lower-fat cuts like pork tenderloin instead of brisket. Additionally, you can experiment with sugar substitutes in the BBQ sauce, or use homemade sauces with less sugar. Try to control the sodium by using less salt and incorporating more spices for flavor without added salt.
What types of BBQ sauce pair best with Oven Kansas City Burnt Ends?
While the classic BBQ sauce recipe provided in the recipe is fantastic, feel free to experiment with different styles! Sweet sauces work well for balancing the smoky flavor of the burnt ends, while a tangy vinegar-based sauce can add a delightful contrast. Consider trying a spicy chipotle sauce for an extra kick!
Oven-Baked Kansas City Burnt Ends: Tender & Delicious BBQ Bliss Card
⚖️ Ingredients:
- 3 lbs beef brisket point (trimmed of heavy fat)
- 2 tablespoons olive oil
- 2 tablespoons brown sugar
- 1 tablespoon smoked paprika
- 1 tablespoon kosher salt
- 1 tablespoon black pepper
- 1 tablespoon garlic powder
- 1 teaspoon onion powder
- 1 teaspoon cayenne pepper (optional)
- 1 cup ketchup
- 1/2 cup apple cider vinegar
- 1/4 cup brown sugar
- 2 tablespoons Worcestershire sauce
- 1 tablespoon Dijon mustard
- 1 teaspoon garlic powder
- 1 teaspoon onion powder
- Salt and pepper to taste
🥄 Instructions:
- Step 1: Trim excess fat from the brisket point and cut it into 1-inch cubes.
- Step 2: In a large bowl, combine olive oil, brown sugar, smoked paprika, salt, pepper, garlic powder, onion powder, and cayenne.
- Step 3: Toss the brisket cubes in the seasoning mixture until well coated. Marinate in the refrigerator for at least 2 hours (or overnight).
- Step 4: Preheat the oven to 275°F (135°C). Arrange seasoned brisket cubes in a single layer on a baking sheet and cover tightly with aluminum foil; bake for 2 hours.
- Step 5: In a saucepan, combine ketchup, apple cider vinegar, brown sugar, Worcestershire sauce, Dijon mustard, garlic powder, and onion powder. Simmer over low heat for 10 minutes, stirring occasionally.
- Step 6: Remove the foil from the baking sheet and increase the oven temperature to 300°F (150°C). Pour half of the BBQ sauce over the burnt ends, tossing to coat. Bake uncovered for another 30-45 minutes or until caramelized.
- Step 7: Toss with remaining BBQ sauce before serving and enjoy while hot!
Previous Recipe: Easy & Juicy Grilled Sirloin Steak with BBQ Glaze: My Go-To Recipe
Next Recipe: Easy & Juicy Slow Cooked Pork Shoulder with BBQ Sauce: My Family's Favorite